Administrator training course
Collecting customer details Part 1
The Most important function of a bodyshop
Believe it or not front of house is by far the most important role in the retention of clients. Customers who feel valued are more likely to use services as they can be open and direct about ther requirements. A friendly face discussing what has happened over a cup of tea can work wonders.
Exercise 1 – Imagine being involved in an accident
How would you feel ? In most cases either foolish or a victim. Foolish for making a mistake. Or a victim because some fool drove into them. The front of house team have to navigate these senarios while obtaining all the information needed to proceed with a claim.
Get the details- What happened – When and how
In many cases an instruction will come over from the insurer or work providor and often the details can be limited. In many cases there are no details at all only a customer name and phone number and collection of this information is imperitive.
You must therefore ensure you obtain the following.
- Full Name
- Address
- Tel no
- Email address
- Accident circumstances – including the date
- See notes on accident circumstances
- Car details including Reg, mileage and Chassis number
If at all possible
- Claim and policy numbers
- Any other parties involved – An opportunity to capture this work also could be made
- Location of accident
- Any witnesses – if a non fault claim can be identified this is helpful for the claim.
Examine the car and record the damage Part 2
A visual examination of the car will be required and its important to collect as much information as possible. The medium used to do this is Images as it conveys information quickly and can be transmitted easily. The following are a selection of image types that are fundamental in the estimating process as they are required for assessing vehicle identification, valuation and incident direction. All of these are required to authorise repair work.
- Vehicle identification data, Reg, Mileage and chassis (Vin) number.
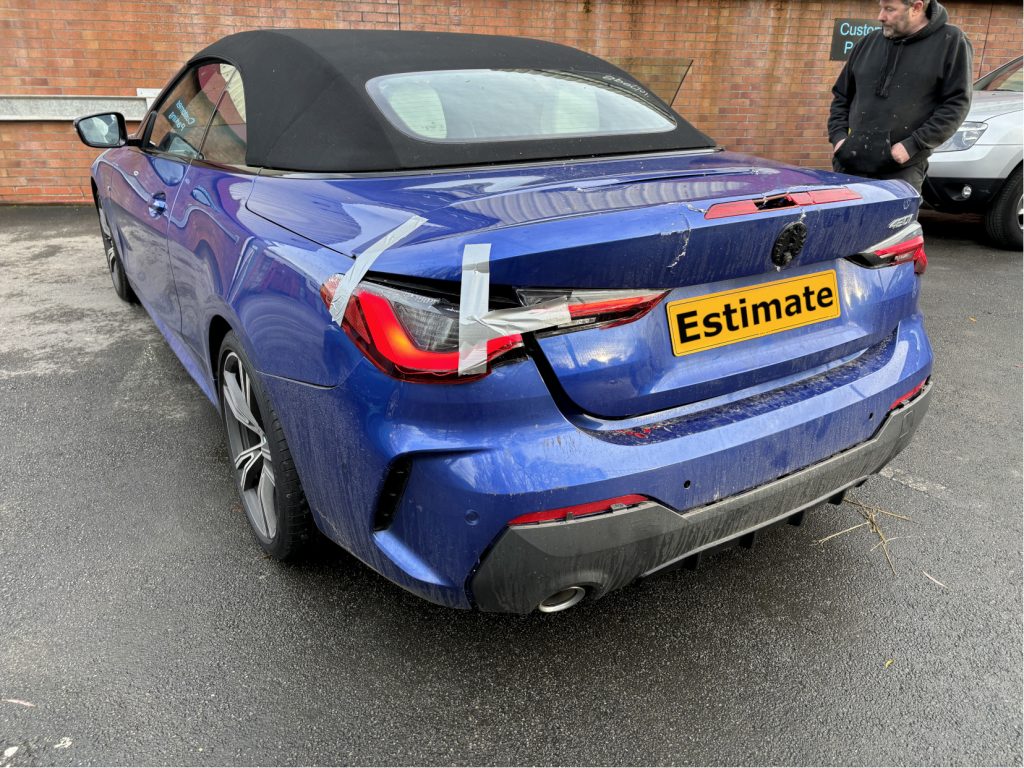
- Damage direction, front to rear, rear to front left to right etc
- Severity of impact. impact travel.
- Initial point of impact through to the last panel damaged
- While at the car examine the tyres and take tyre depths to ensure they meet minimum legal requirements
- Look for any ADAS equipment fitted, cameras etc
- Determine if any Pyrotechnic devices have deployed and record the damage if any.
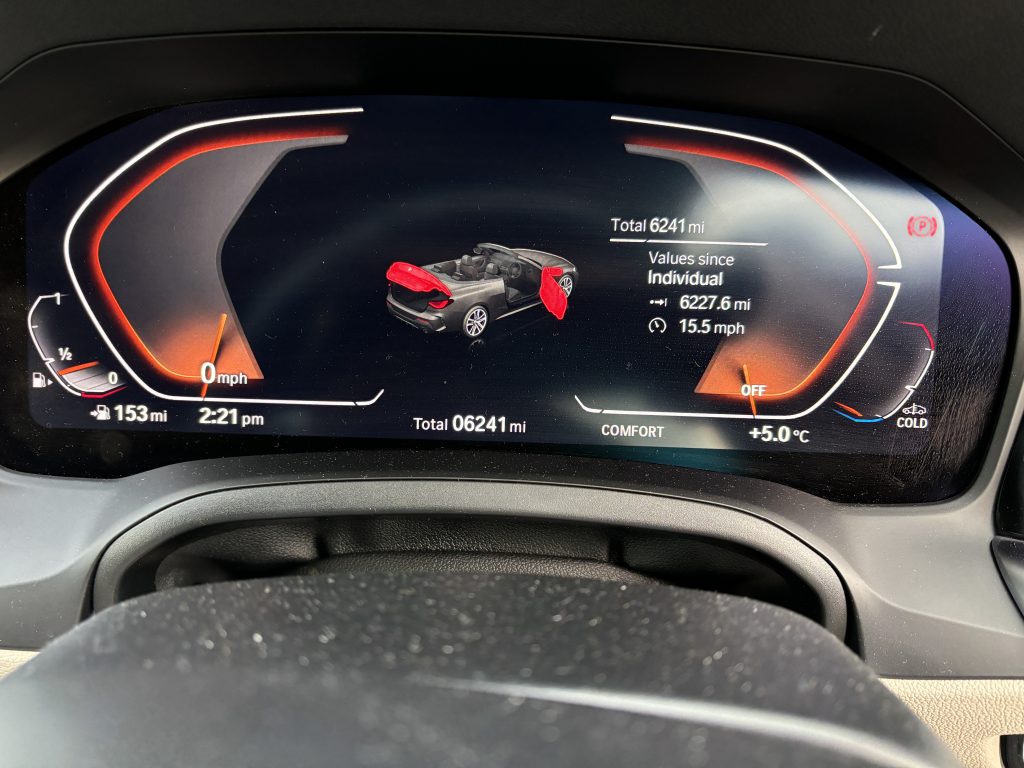
- An image of the vehicle running will show if an airbag light is illuminated along with another other warning lights
If possible get images of the VIN Plate and any other information plates. This one also includes a colour code
Often there is internal damage which is clearly visible. Displaced parts can also be seen. Image as much as possible.
Important - Images of any safety cameras should be recorded if possible. This ensures ADAS is considered
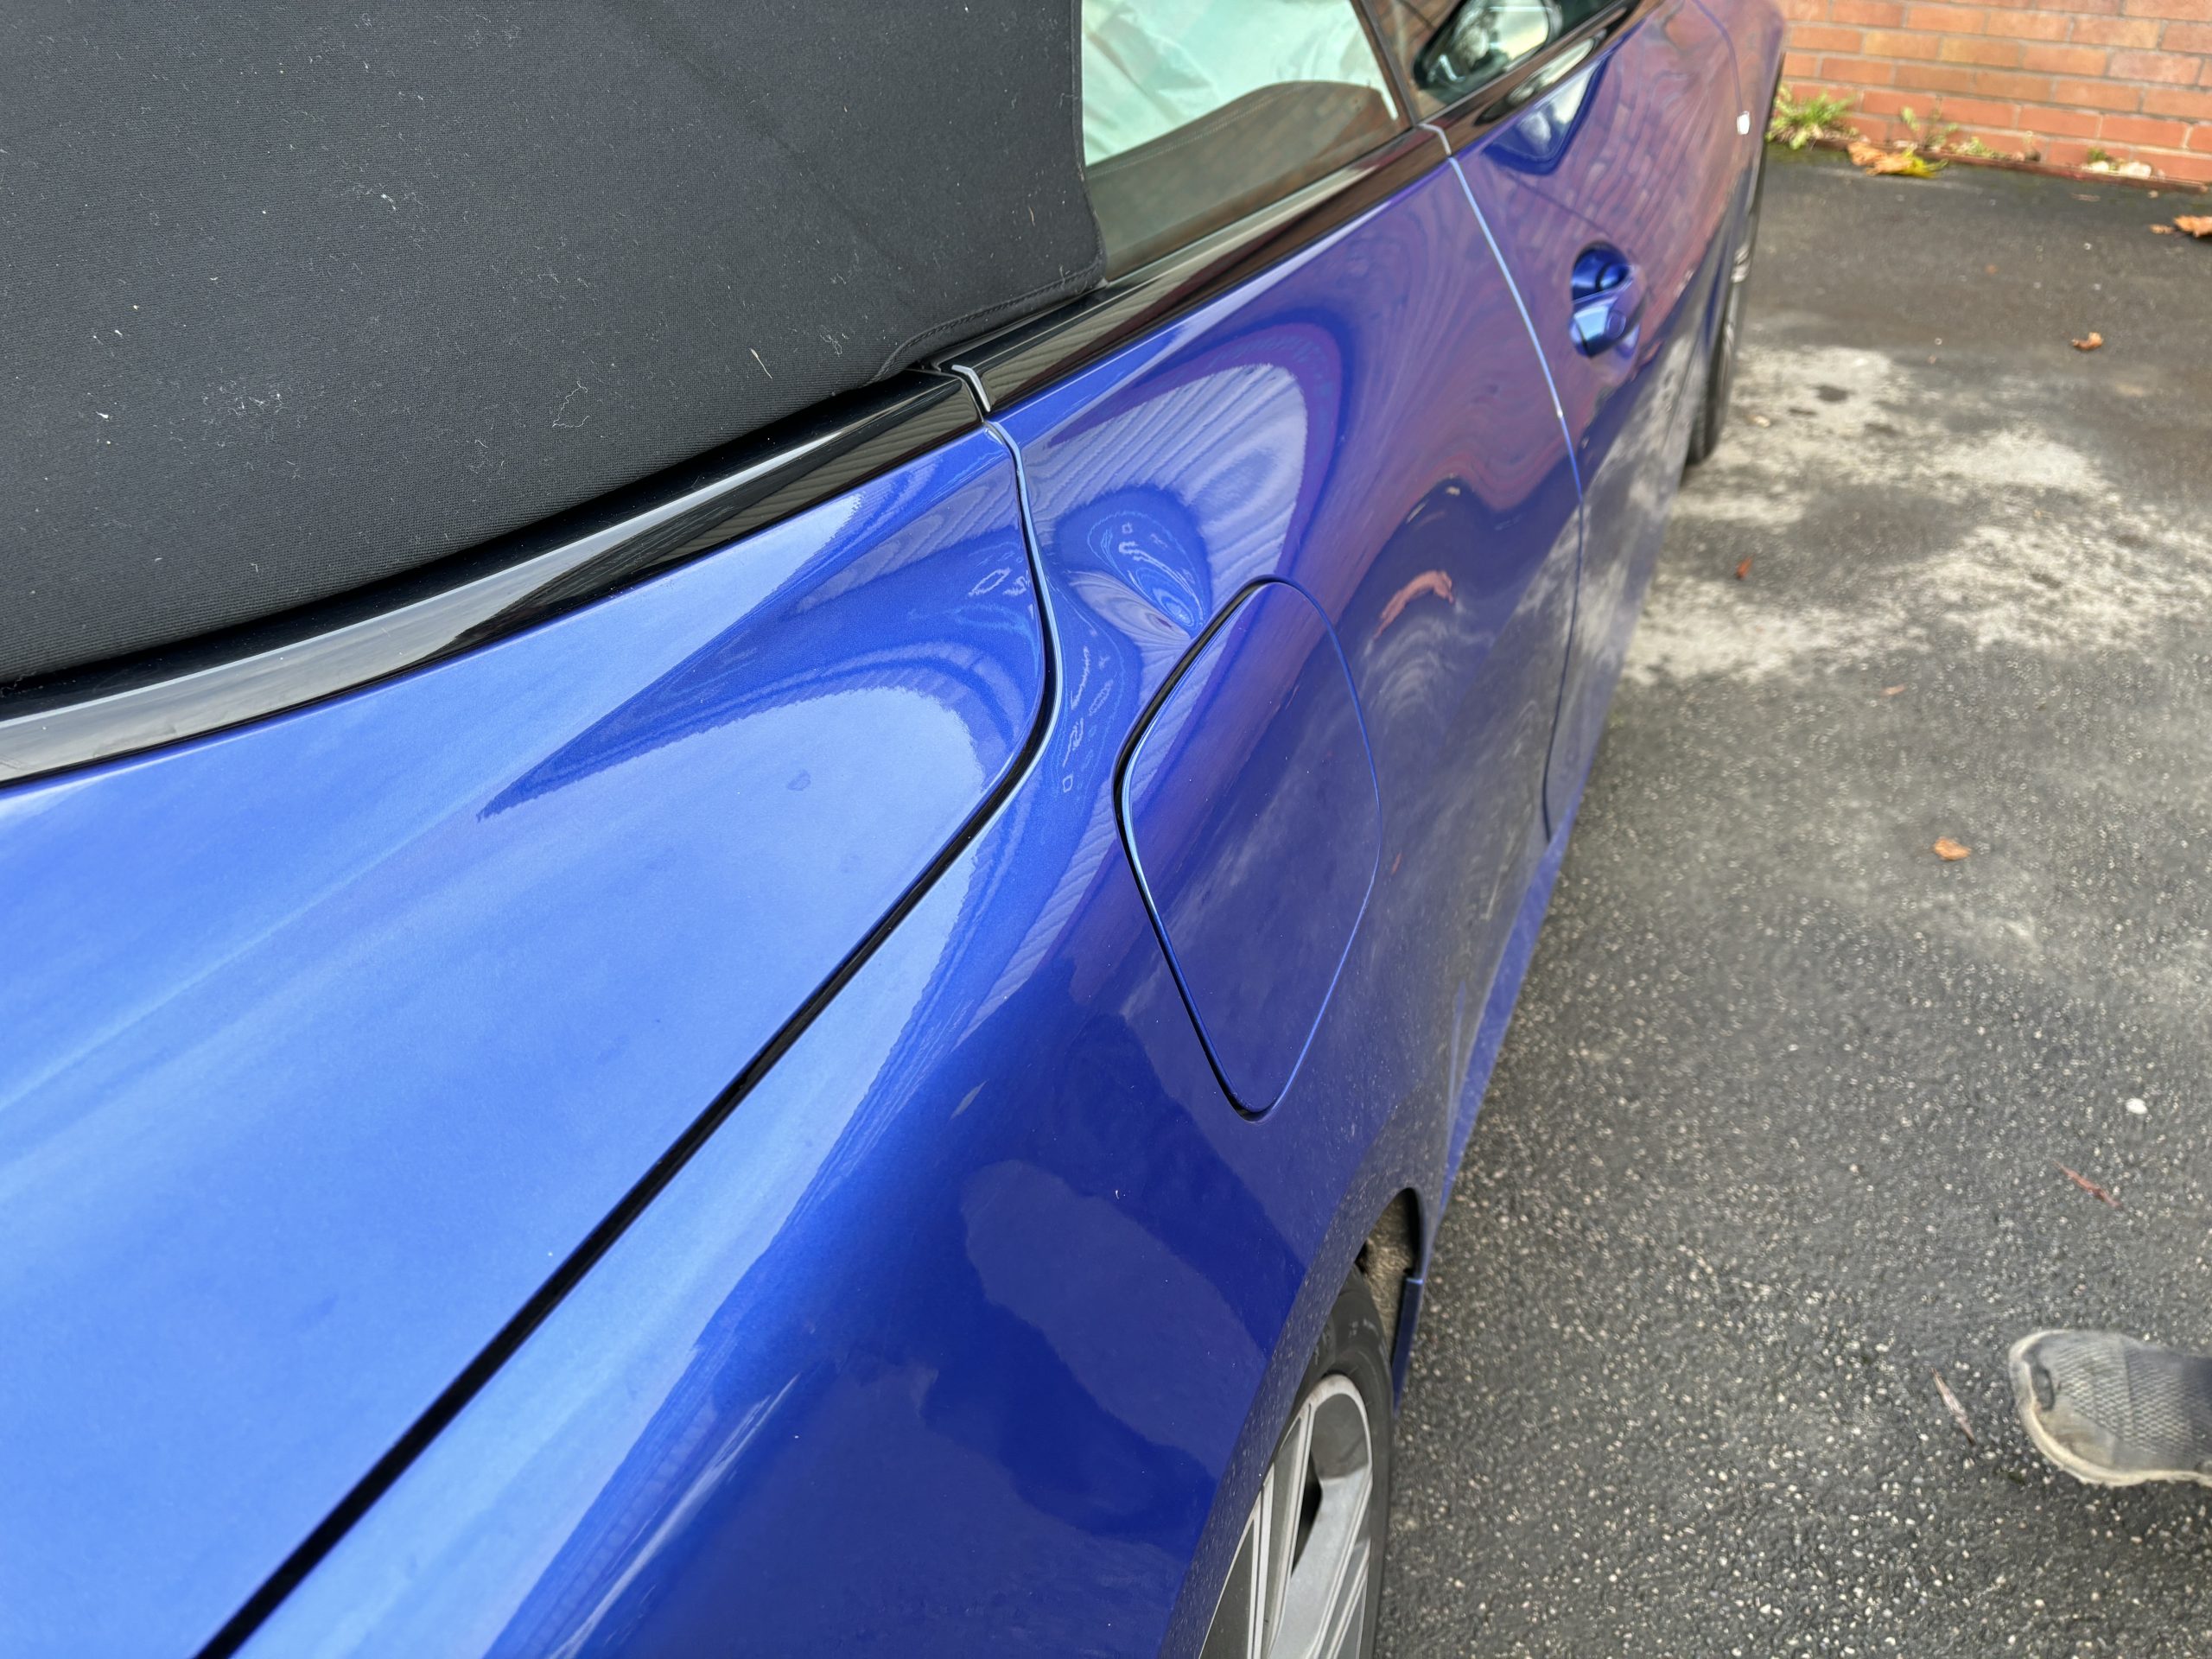
Important - Images of all relevant damage should be taken in a way to demonstrate where damage it is located - Here there is a dent above the fuel flap - This information allows the estimator to know the fuel flap and hoood panel will require paint. ( Note the damage is central to the image)
Practical assessment (Taking images) part 3
Using the tablets provided, go to the car park and find the following vehicle and take the following images – Remember to make sure all images taken are clear and focussed.
- 3/4 view of the car from 4 angles ensure the registration plate is visible
- Chassis number – from the windscreen and from the decal inside the door
- Mileage
- Three or four images of any damage found taken at a distance of at least 1 metre.
- A small number of close up shots for items with minor damage- Cracks – scratches etc
- A walk around of the vehicle to see if there is any unrelated damage.
Practical assessment (Assessment creation) part 4
Creating the shell
- Open audatex with the username and login provided
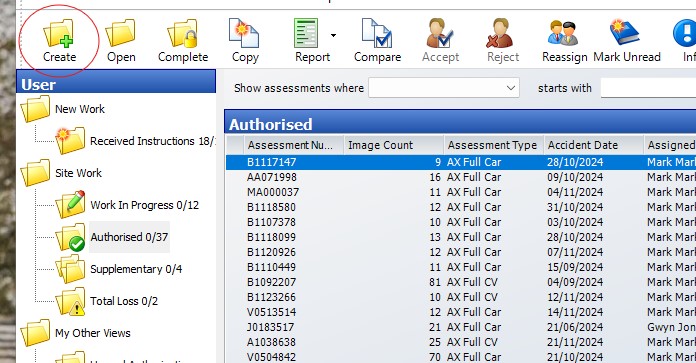
- Click the left button titled Create
- This creates an estimate shell in which to add the customer, vehicle and claim details.
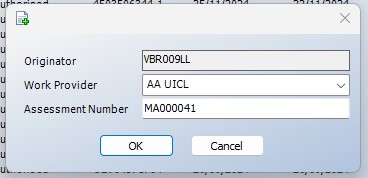
4. Before the assessment is opened a choice of work providor can be made. From a drop down box a large number of work providers can be found. A number of these work providers have specific requriements which must be met before an assessment can be networked. A list can be seen at the bottom of the page
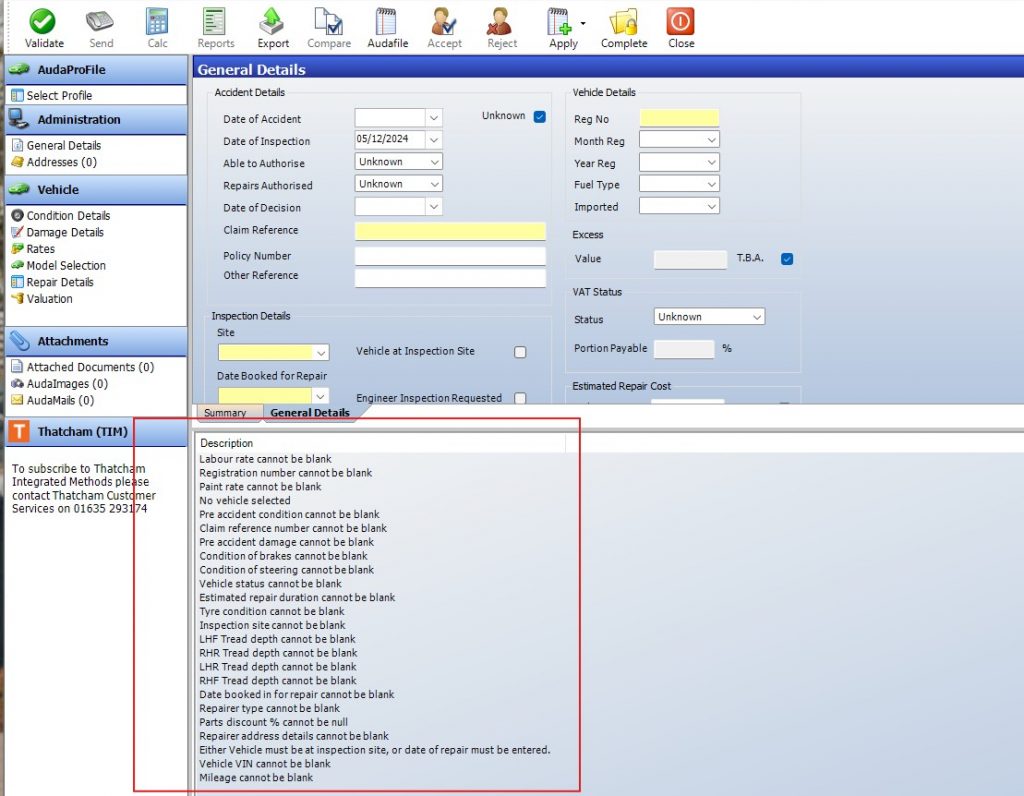
5. The list of requirements for this provider is significant and all the items must be completed before the assessment can be calculated.
As you can see the list includes items such as labour and paint rates, tyres, pre accident consdition, claim reference numbers etc etc
Adding customer and repairer details
Input Customer details
For the purposes of the assessment the customer details are as follows
- Customer name : Jack smith
- Address: 9 hillside road offerton stockport SK2 5EW
- Tel: 07585 544 877
- Email address : jsmith@hotmail.com
Input Repairer Details
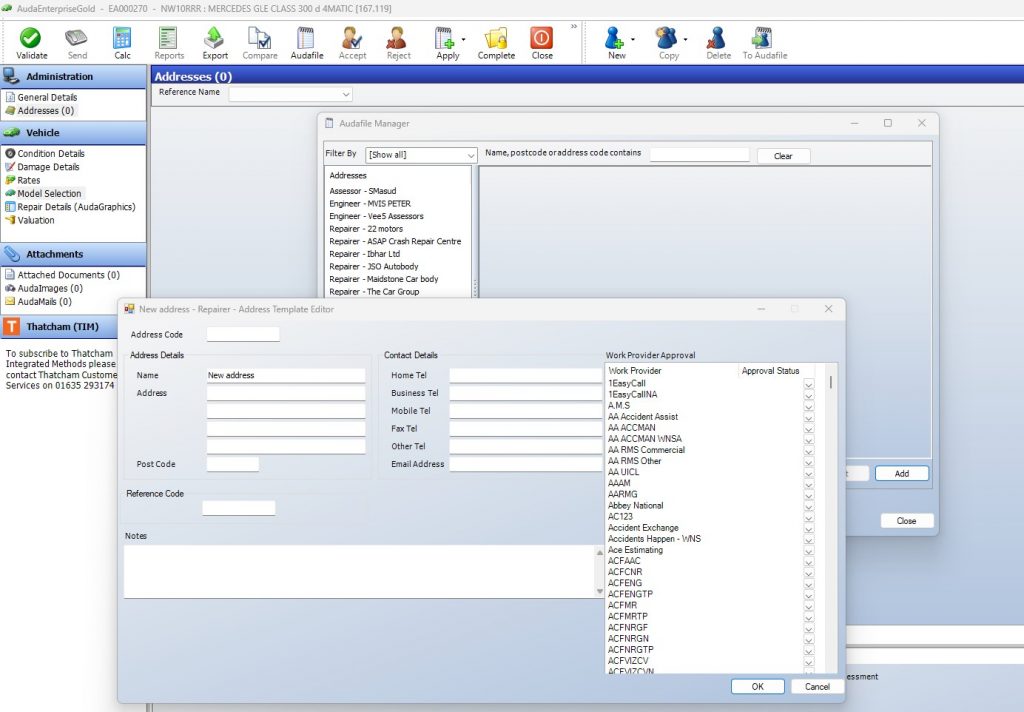
To save time and to avoid repeated inputting of data Audatex uses something called Audafile. This allows the saving of data that is often repeated.
- Create an address code
- Input the following repairer details
- Repairer Name: Carlac Repair Centre
- Address : 111 smethy road, Hammersmith, London LW1 3GQ
- Tel 07887 654 565
- Email: info@carlac.org.uk
Add images
So far we have created a shell, input customer and repairer details.
- We now need to add the images and the following is the method used
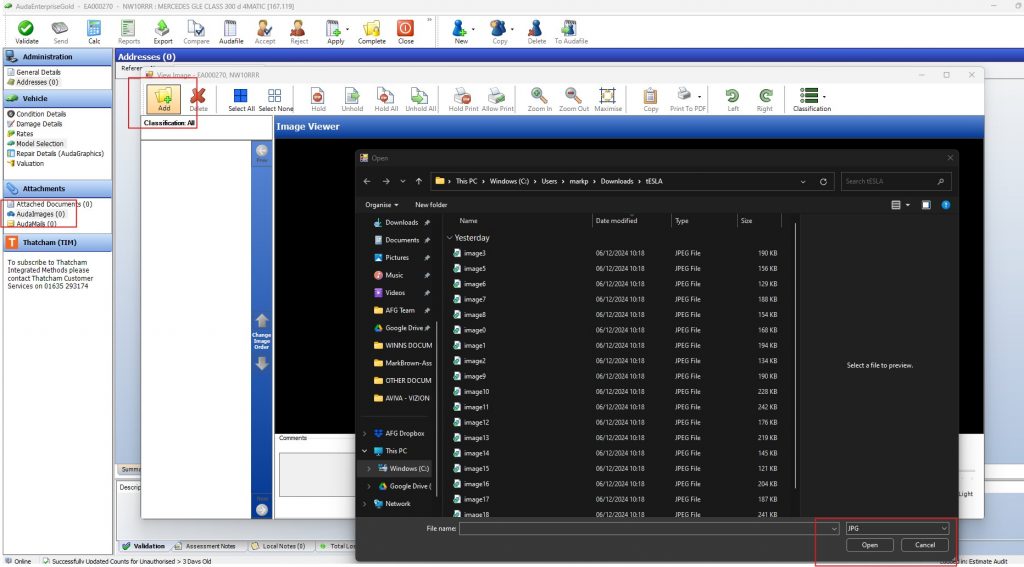
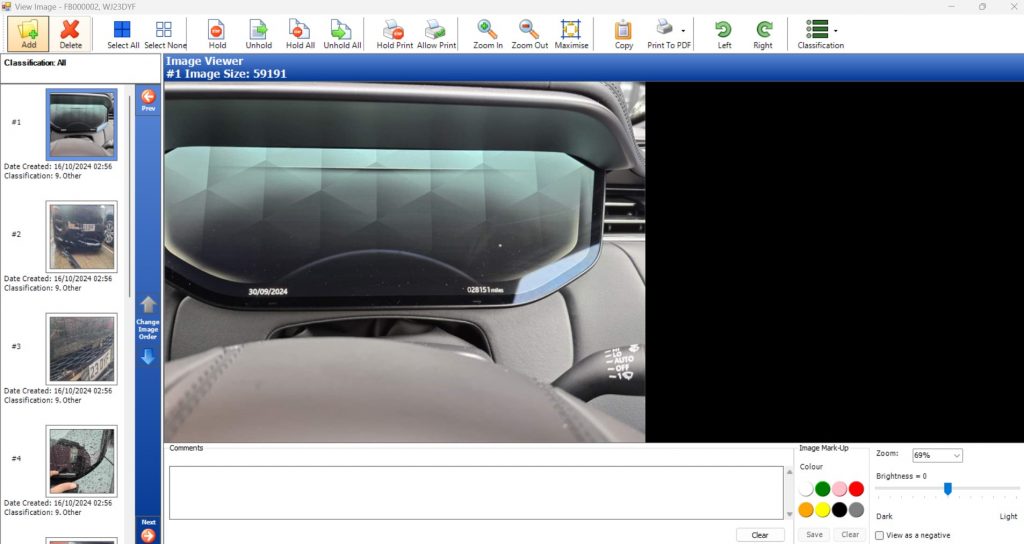
2. When you have uploaded the images, Audatex resizes them so they can be easily transmitted. Its important not to take too many images as this can be overwhelming when they are received. Similarly you must take enough images to demonstrate everything t hat is damaged and requires repair.
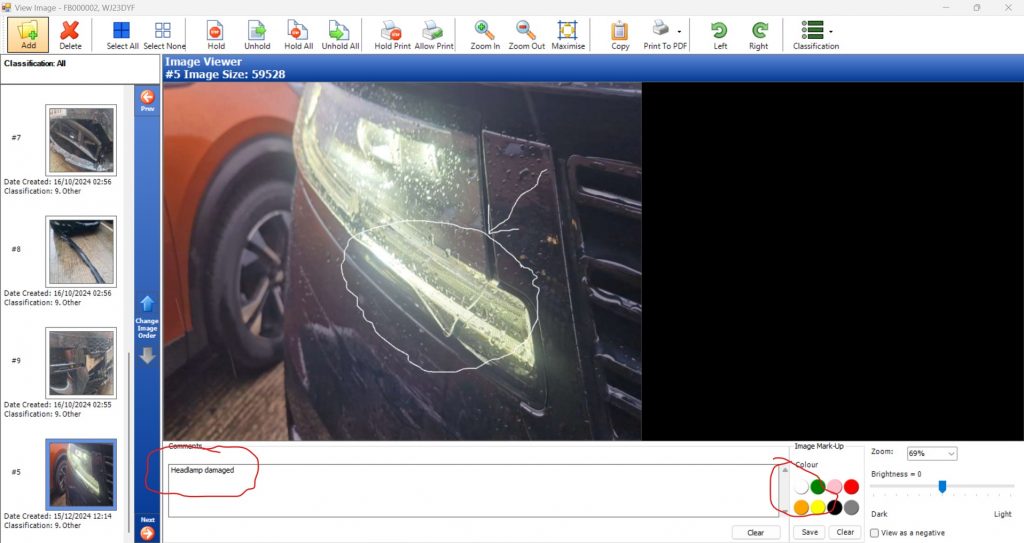
3. Images in Audatex can be marked up in the program using the image markup tool. Its preferable to also add comments at the bottom for clarity. The more information you can give here the better the response from the engineer or assessors who is authorising the work. Very often what is obvious to you may not be to someone on the receiving end. As an example the image here shows the headlamp with damage. Is it a scratch or a crack? Can it be polished or should it be replaced? How would you demonstrate this to the engineer?
Creating the estimate
- We need to allow the system to identify the vehicle. It does this with information from DVLA
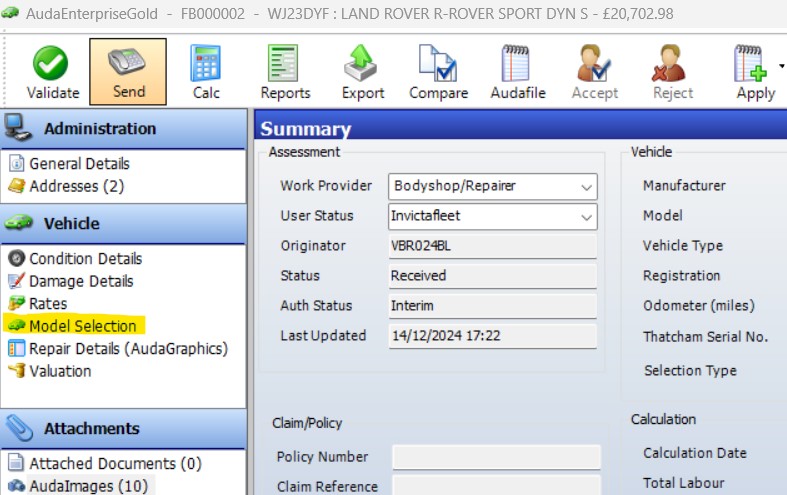
2. The model selection button opens a dialogue which in may cases will automatically select the correct make, model and vehicle specifications. Add the registration number in the yellow box and click the next button at the bottom. Its important to understand that Audatex does not ALWAYS find the correct spec and additional information may be required from the user. A good example would be Nissan. Qashqai models have 360 cameras but this is often not detected. Some Vauxhall models automatically select painted bumpers when they are not.
Always remember the system is a guide and not to be 100% relied upon. Checks must be made to corroborate what is presented to the insurer.
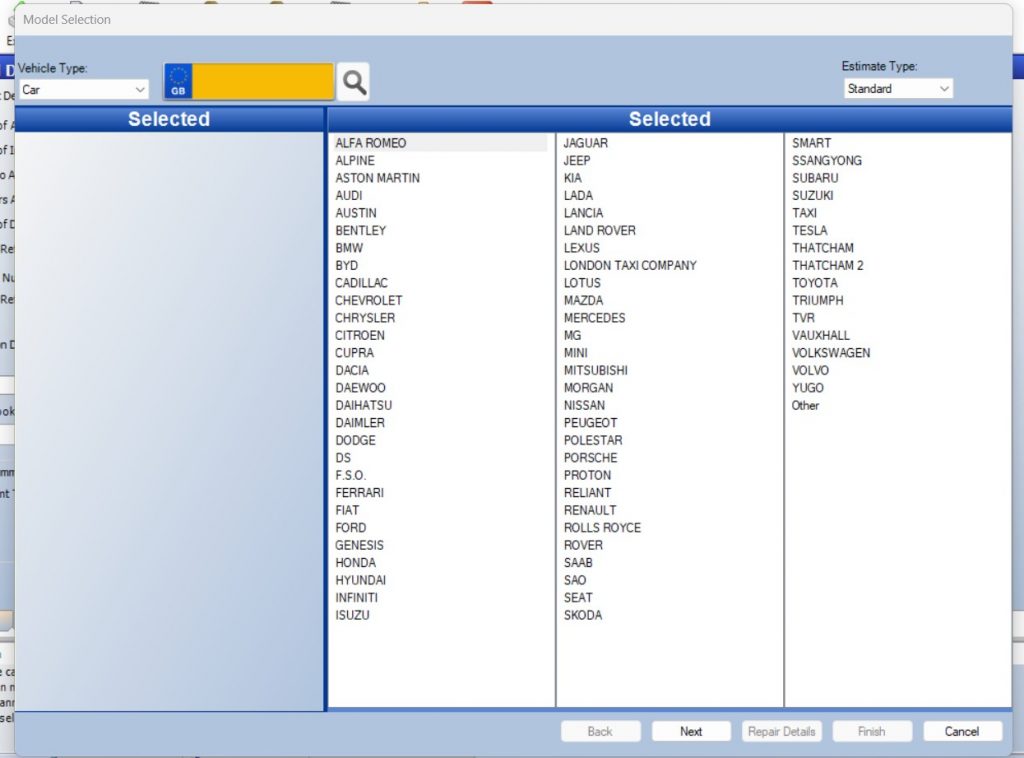
3. Audatex then shows the vehicles details, and specifications that it has extracted from the database. It does NOT however demonstrate optional factory extras that were fitted. For this you must either carry out a full HPI check or a thorough examination of the car will reveal what needs to be included. This is why images are so important. Capture images of fog lamps, parking sensors, any ADAS cameras, Tyre sizes, alloy wheel designs, decals or any unusual feature you see.
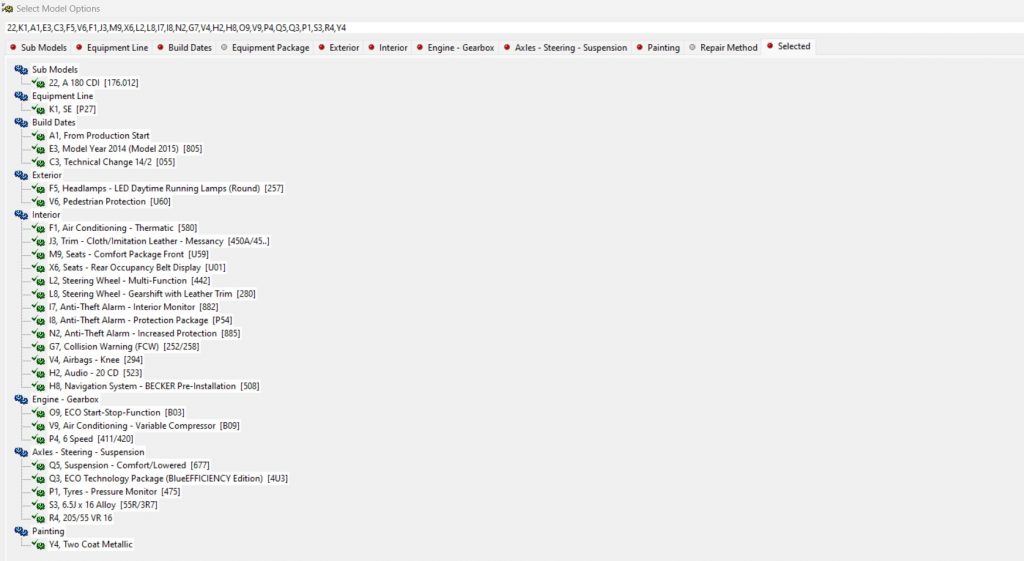
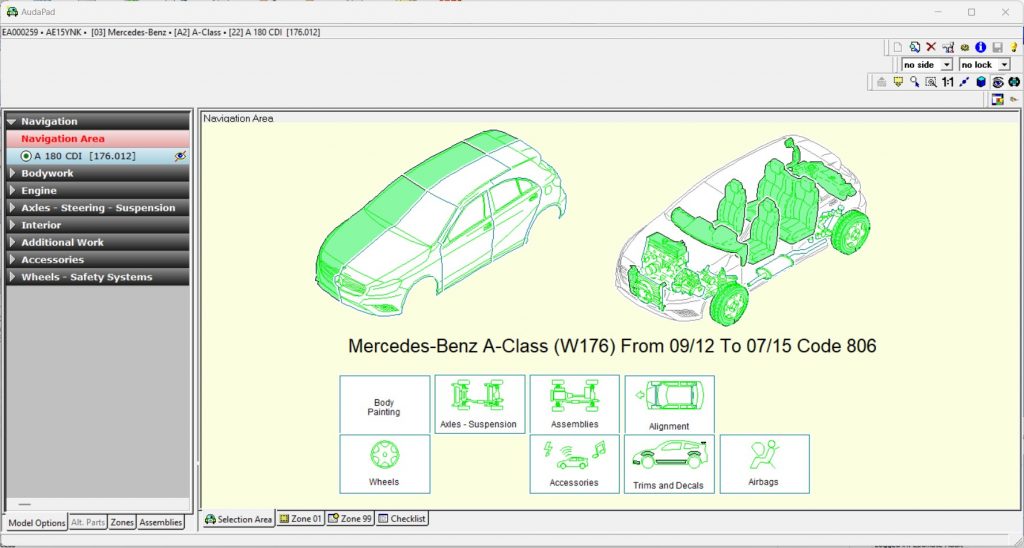
4. The system will automatically open up the graphics at this point demonstrating an image of the car. The two images in the screen depict several areas of the car. These include exterior and interior bodywork. Seats and dashboard areas and mechanical sections. All of which have several pages to break apart the car so parts can be identified. If you imagine a jigsaw the graphics are similar in that you can individually itemise parts that make up the vehicle.
